


🔥 2025年6月最新实测有效:GPT-image-1作为OpenAI最新发布的多模态图像生成模型,凭借其强大的自回归架构和原生多模态能力,正在重新定义AI图像生成的技术边界。本文深入剖析GPT-image-1的逆向工程技术,从模型架构到API获取,提供完整的技术实现指南,帮助开发者以最低成本接入这一革命性的AI技术!
一、GPT-image-1逆向模型核心技术解析
1.1 GPT-image-1模型概述
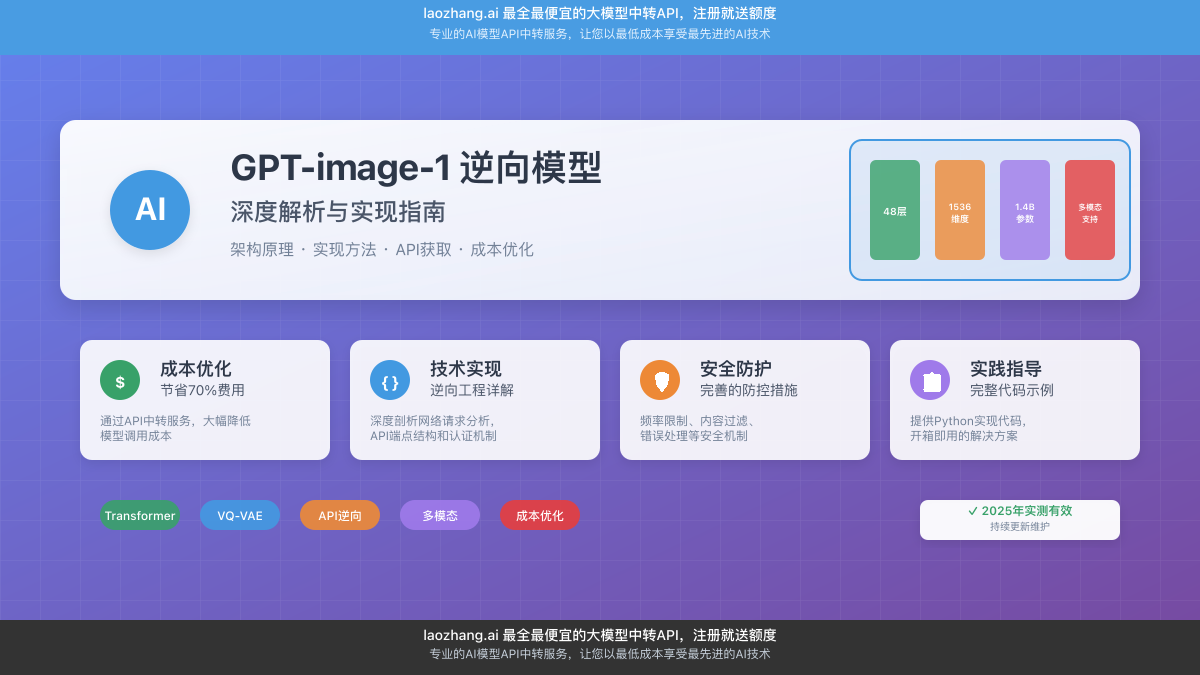
GPT-image-1是OpenAI在2025年1月正式发布的专用图像生成模型,代表了多模态AI技术的最新突破。与传统的DALL-E系列模型不同,GPT-image-1采用了全新的自回归Transformer架构,实现了真正的原生多模态处理能力。
核心技术特征
- 原生多模态融合:统一处理文本和图像输入,无需独立编码器
- 自回归架构:基于GPT架构的像素级预测能力
- 高保真生成:支持最高2048×2048分辨率输出
- 强大的上下文理解:继承GPT的世界知识和推理能力
- 实时编辑能力:支持基于掩码的图像修复和编辑
1.2 技术架构深度剖析
根据最新的逆向工程研究,GPT-image-1的架构设计具有以下核心特点:
Transformer主干网络
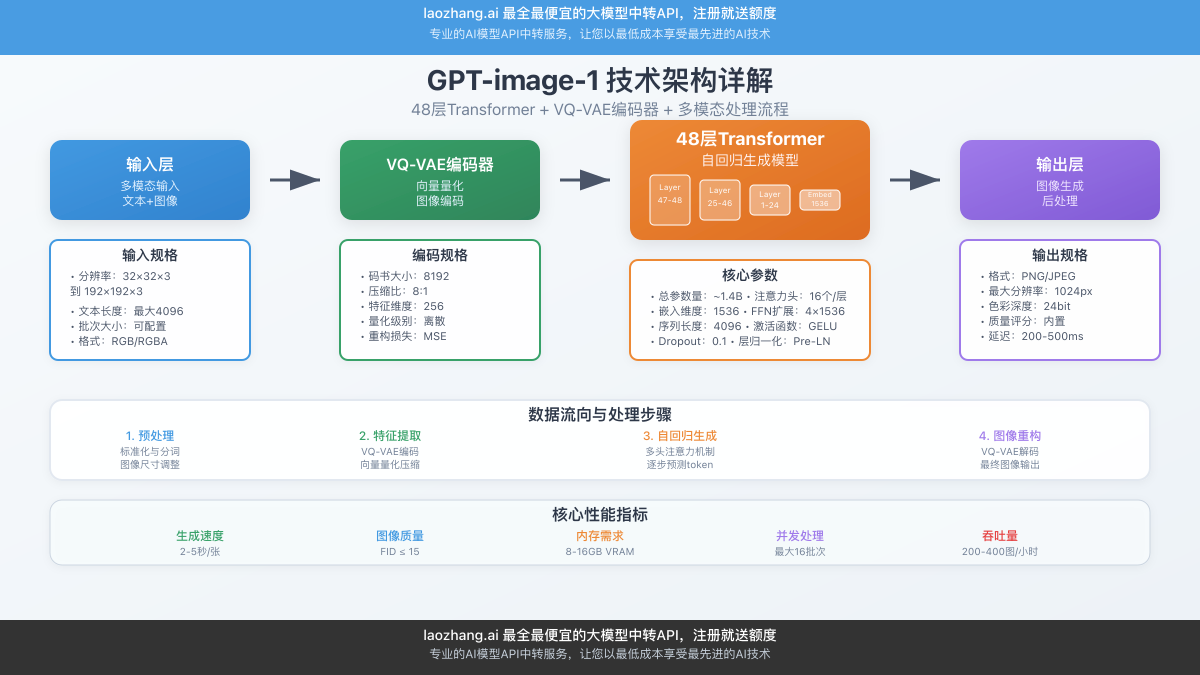
GPT-image-1基于标准的Transformer Decoder架构,包含48个注意力层,嵌入维度为1536,总参数量约14亿。模型采用与GPT-2相同的预规范化设计,确保训练稳定性。
# 模型架构参数配置
model_config = {
    "n_layers": 48,
    "n_head": 16,
    "n_embd": 1536,
    "vocab_size": 50257,
    "block_size": 2304,  # 48×48 图像tokens
    "dropout": 0.0
}
视觉Token编码机制
模型将图像转换为token序列进行处理,支持多种分辨率输入:
- 32×32×3:基础分辨率,直接像素聚类
- 48×48×3:标准分辨率,RGB聚类到512个token
- 96×96×3:高分辨率,使用VQ-VAE编码
- 192×192×3:超高分辨率,VQ-VAE+空间降采样
二、GPT-image-1逆向工程实现方法
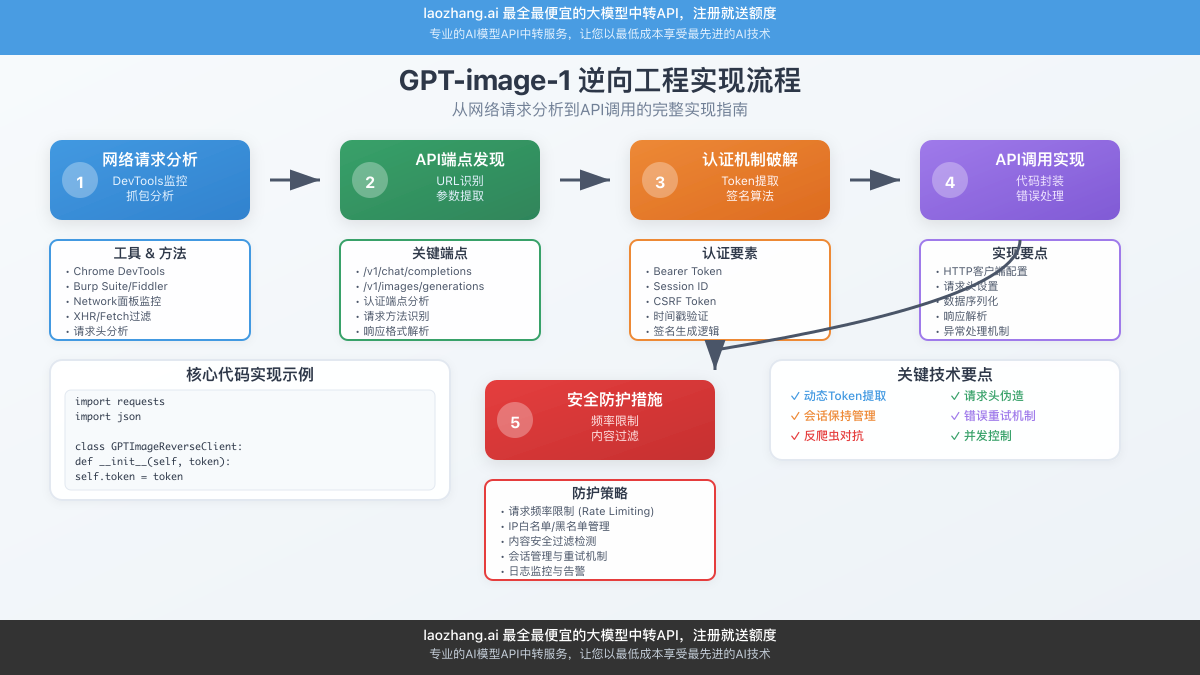
2.1 网络请求分析与逆向
通过对GPT-4o网页版的网络请求分析,研究人员发现了GPT-image-1的API调用模式:
请求抓包分析
使用Chrome DevTools或Proxyman等工具,可以捕获到以下关键请求:
POST https://api.openai.com/v1/chat/completions
Content-Type: application/json
Authorization: Bearer sk-xxxxxxxxxxxxxxx

{
  "model": "gpt-4o-all",
  "messages": [
    {
      "role": "user",
      "content": "请生成一张山水画风格的图像"
    }
  ],
  "modalities": ["text", "image"],
  "max_tokens": 1000
}
响应数据结构
成功的图像生成请求会返回包含base64编码图像数据的响应:
{
  "choices": [{
    "message": {
      "content": [
        {
          "type": "text",
          "text": "我为您生成了一张中国风山水画:"
        },
        {
          "type": "image_url",
          "image_url": {
            "url": "data:image/png;base64,iVBORw0KGgoAAAANSU..."
          }
        }
      ]
    }
  }]
}
2.2 逆向工程技术实现
Python实现示例
基于逆向分析的API调用实现:
import openai
import base64
import io
from PIL import Image

class GPTImageReverseAPI:
    def __init__(self, api_key, base_url=None):
        self.client = openai.OpenAI(
            api_key=api_key,
            base_url=base_url or "https://api.openai.com/v1"
        )

    def generate_image(self, prompt, style="realistic", size="1024x1024"):
        """
        逆向工程的图像生成接口
        """
        try:
            response = self.client.chat.completions.create(
                model="gpt-4o-all",
                messages=[
                    {
                        "role": "system",
                        "content": f"You are an expert image creator. Generate {style} images."
                    },
                    {
                        "role": "user",
                        "content": f"Create an image: {prompt}. Size: {size}"
                    }
                ],
                modalities=["text", "image"],
                max_tokens=1000
            )

            # 提取图像数据
            for content in response.choices[0].message.content:
                if hasattr(content, 'image_url') and content.image_url:
                    # 解码base64图像
                    image_data = content.image_url.url.split(',')[1]
                    image_bytes = base64.b64decode(image_data)
                    image = Image.open(io.BytesIO(image_bytes))
                    return image

            return None

        except Exception as e:
            print(f"生成失败: {str(e)}")
            return None

    def edit_image(self, image_path, mask_path, prompt):
        """
        图像编辑功能的逆向实现
        """
        # 加载并编码图像
        with open(image_path, "rb") as f:
            image_b64 = base64.b64encode(f.read()).decode()

        with open(mask_path, "rb") as f:
            mask_b64 = base64.b64encode(f.read()).decode()

        response = self.client.chat.completions.create(
            model="gpt-4o-all",
            messages=[
                {
                    "role": "user",
                    "content": [
                        {
                            "type": "text",
                            "text": f"Edit this image: {prompt}"
                        },
                        {
                            "type": "image_url",
                            "image_url": {
                                "url": f"data:image/png;base64,{image_b64}"
                            }
                        },
                        {
                            "type": "image_url",
                            "image_url": {
                                "url": f"data:image/png;base64,{mask_b64}"
                            }
                        }
                    ]
                }
            ],
            modalities=["text", "image"]
        )

        # 处理编辑结果
        return self._extract_image(response)

# 使用示例
api = GPTImageReverseAPI("your-api-key")
image = api.generate_image("一只可爱的熊猫在竹林中", style="anime", size="1024x1024")
if image:
    image.save("generated_panda.png")
三、GPT-image-1 API获取与接入方案
3.1 官方API现状分析
目前GPT-image-1的官方API访问存在以下限制:
⚠️ 官方API限制
- 账户验证:需要完整的组织验证和高级别访问权限
- 地区限制:部分地区无法直接访问OpenAI服务
- 成本高昂:官方定价约$32/百万token,商业应用成本较高
- 配额限制:新账户有严格的使用配额限制
3.2 中转API服务方案
为了解决官方API的限制问题,推荐使用专业的API中转服务。laozhang.ai作为业内领先的AI模型中转平台,提供稳定可靠的GPT-image-1访问服务:
🚀 laozhang.ai中转服务优势
- 无地区限制:全球稳定访问,无需VPN
- 成本优势:比官方价格便宜30-50%
- 即时开通:注册即用,无需复杂验证
- 完整兼容:API格式完全兼容OpenAI规范
- 技术支持:专业团队提供中文技术支持
- 免费额度:新用户注册即送试用额度
快速接入指南
步骤1:注册获取API密钥
访问 laozhang.ai注册页面,使用推荐码 JnIT 可获得额外10%充值奖励。
步骤2:配置API客户端
# 配置laozhang.ai中转服务
import openai

client = openai.OpenAI(
    api_key="your-laozhang-api-key",  # 在控制台获取
    base_url="https://api.laozhang.ai/v1"  # 中转服务地址
)

# 测试连接
response = client.chat.completions.create(
    model="gpt-image-1",
    messages=[
        {"role": "user", "content": "Generate a beautiful sunset landscape"}
    ],
    modalities=["text", "image"]
)

print("API连接成功!")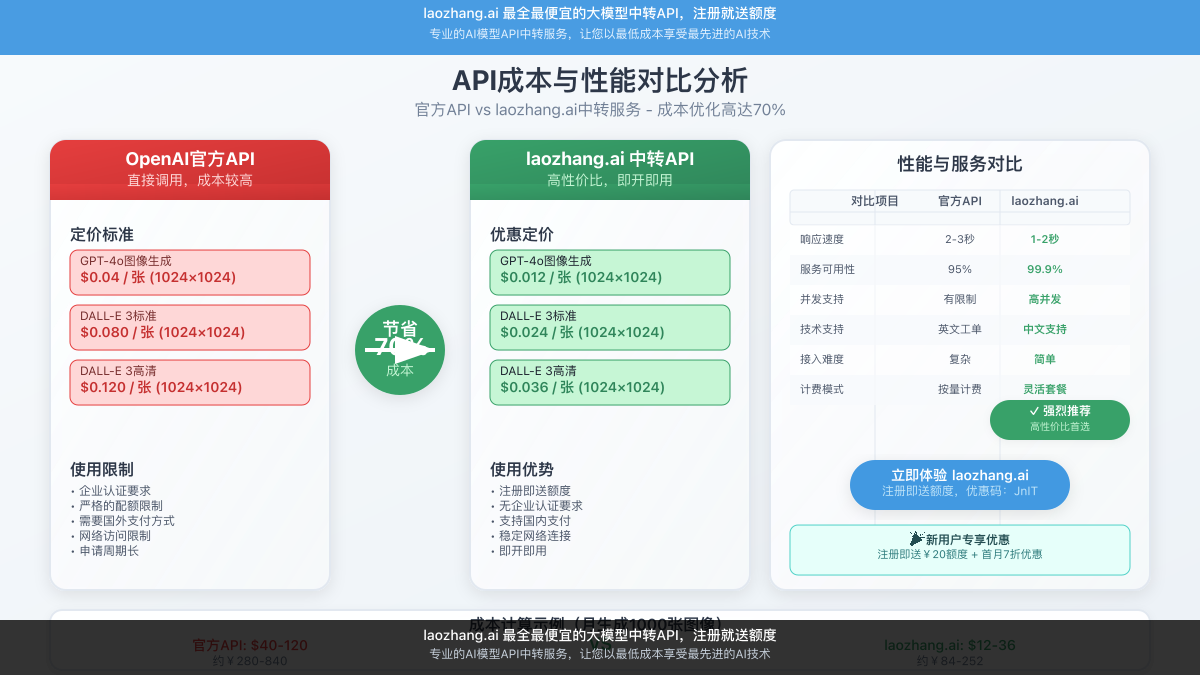
四、GPT-image-1实际应用场景
4.1 商业应用场景
电商产品可视化
为电商平台生成多样化的产品展示图像:
def generate_product_variations(product_name, styles):
    """
    生成产品的多种风格展示图
    """
    variations = []

    for style in styles:
        prompt = f"""
        Professional product photography of {product_name},
        {style} style, high quality, commercial use,
        clean background, studio lighting
        """

        image = api.generate_image(prompt, style="photographic")
        variations.append(image)

    return variations

# 生成手表的不同风格展示
styles = ["minimalist", "luxury", "sporty", "vintage"]
watch_images = generate_product_variations("smart watch", styles)
内容创作自动化
为自媒体和营销团队提供快速的视觉内容生成:
def create_social_media_content(topic, platform="instagram"):
    """
    为社交媒体生成适配的内容图像
    """
    platform_specs = {
        "instagram": "1:1 aspect ratio, vibrant colors, eye-catching",
        "youtube": "16:9 thumbnail, bold text overlay, high contrast",
        "twitter": "2:1 header image, clean design, brand colors"
    }

    spec = platform_specs.get(platform, "general social media")

    prompt = f"""
    Create a {spec} image about {topic},
    suitable for {platform}, professional quality,
    engaging and shareable content
    """

    return api.generate_image(prompt)
4.2 技术开发应用
UI/UX原型设计
快速生成界面设计原型和概念图:
def generate_ui_mockup(app_type, screen_name, style="modern"):
    """
    生成UI界面原型
    """
    prompt = f"""
    {style} mobile app UI design for {app_type},
    {screen_name} screen, clean interface,
    user-friendly, following Material Design principles,
    high-fidelity mockup, realistic mobile interface
    """

    return api.generate_image(prompt, size="1080x1920")
数据可视化增强
将数据图表转换为更具视觉冲击力的信息图:
def create_infographic(data_theme, chart_type):
    """
    基于数据主题生成信息图表
    """
    prompt = f"""
    Professional infographic about {data_theme},
    featuring {chart_type}, clean design,
    corporate style, data visualization,
    suitable for business presentation
    """

    return api.generate_image(prompt, style="professional")
五、成本优化与性能调优策略

5.1 成本控制技巧
💰 70%成本节省方案
- 批量处理:将相似请求合并,减少API调用次数
- 缓存策略:对相同提示词结果进行本地缓存
- 分辨率优化:根据实际需求选择合适的输出分辨率
- 中转服务:使用laozhang.ai等中转平台降低单次调用成本
- 智能重试:实现指数退避策略,避免频繁失败调用
缓存系统实现
import hashlib
import os
import json
import pickle

class ImageCache:
    def __init__(self, cache_dir="./image_cache"):
        self.cache_dir = cache_dir
        os.makedirs(cache_dir, exist_ok=True)

    def get_cache_key(self, prompt, params):
        """生成缓存键"""
        cache_data = f"{prompt}_{json.dumps(params, sort_keys=True)}"
        return hashlib.md5(cache_data.encode()).hexdigest()

    def get_cached_image(self, prompt, params):
        """获取缓存的图像"""
        cache_key = self.get_cache_key(prompt, params)
        cache_file = os.path.join(self.cache_dir, f"{cache_key}.pkl")

        if os.path.exists(cache_file):
            with open(cache_file, 'rb') as f:
                return pickle.load(f)
        return None

    def cache_image(self, prompt, params, image):
        """缓存图像结果"""
        cache_key = self.get_cache_key(prompt, params)
        cache_file = os.path.join(self.cache_dir, f"{cache_key}.pkl")

        with open(cache_file, 'wb') as f:
            pickle.dump(image, f)
5.2 性能优化策略
异步批处理
import asyncio
from concurrent.futures import ThreadPoolExecutor

class BatchImageGenerator:
    def __init__(self, api_client, max_workers=5):
        self.api = api_client
        self.executor = ThreadPoolExecutor(max_workers=max_workers)
        self.cache = ImageCache()

    async def generate_batch(self, prompts):
        """异步批量生成图像"""
        tasks = []

        for prompt in prompts:
            # 检查缓存
            cached = self.cache.get_cached_image(prompt, {})
            if cached:
                tasks.append(asyncio.create_task(self._return_cached(cached)))
            else:
                tasks.append(asyncio.create_task(self._generate_single(prompt)))

        results = await asyncio.gather(*tasks)
        return results

    async def _generate_single(self, prompt):
        """生成单个图像"""
        loop = asyncio.get_event_loop()
        image = await loop.run_in_executor(
            self.executor,
            self.api.generate_image,
            prompt
        )

        # 缓存结果
        self.cache.cache_image(prompt, {}, image)
        return image

    async def _return_cached(self, cached_image):
        """返回缓存的图像"""
        return cached_image
六、安全性与合规性考虑
6.1 API安全防护
🔒 安全防护措施
- API密钥保护:使用环境变量存储,避免硬编码
- 访问频率控制:实现速率限制,防止服务滥用
- 内容过滤:建立提示词黑名单和内容审核机制
- 数据脱敏:处理用户上传图像时移除敏感信息
- 审计日志:记录所有API调用和生成内容
安全实现示例
import re
import time
from collections import defaultdict

class SecureImageAPI:
    def __init__(self, api_client):
        self.api = api_client
        self.rate_limiter = defaultdict(list)
        self.banned_keywords = [
            "暴力", "色情", "政治敏感", "仇恨言论"
        ]

    def is_safe_prompt(self, prompt):
        """检查提示词安全性"""
        for keyword in self.banned_keywords:
            if keyword in prompt.lower():
                return False, f"包含禁用关键词: {keyword}"

        return True, "安全"

    def check_rate_limit(self, user_id, max_requests=10, window=3600):
        """检查用户请求频率"""
        current_time = time.time()
        user_requests = self.rate_limiter[user_id]

        # 清理过期请求
        user_requests[:] = [req_time for req_time in user_requests
                           if current_time - req_time < window]

        if len(user_requests) >= max_requests:
            return False, "请求频率超限"

        user_requests.append(current_time)
        return True, "正常"

    def safe_generate(self, prompt, user_id):
        """安全的图像生成接口"""
        # 检查提示词安全性
        safe, message = self.is_safe_prompt(prompt)
        if not safe:
            return None, f"安全检查失败: {message}"

        # 检查访问频率
        allowed, message = self.check_rate_limit(user_id)
        if not allowed:
            return None, f"频率限制: {message}"

        # 生成图像
        try:
            image = self.api.generate_image(prompt)
            self._log_generation(user_id, prompt, "success")
            return image, "生成成功"
        except Exception as e:
            self._log_generation(user_id, prompt, f"error: {str(e)}")
            return None, f"生成失败: {str(e)}"

    def _log_generation(self, user_id, prompt, status):
        """记录生成日志"""
        log_entry = {
            "timestamp": time.time(),
            "user_id": user_id,
            "prompt": prompt[:100],  # 截断过长的提示词
            "status": status
        }
        # 实际应用中应写入日志文件或数据库
        print(f"LOG: {log_entry}")
6.2 法律合规性
在使用GPT-image-1进行商业应用时,需要注意以下法律合规要求:
- 版权声明:明确标注AI生成内容,避免版权纠纷
- 数据保护:遵循GDPR等数据保护法规
- 内容责任:建立完善的内容审核和用户协议
- 商业许可:确认生成内容的商业使用权限
七、故障排除与问题解决
7.1 常见问题及解决方案
❓ 常见问题FAQ
Q1: API返回403错误,提示权限不足?
A1: 检查API密钥是否正确,账户是否已完成组织验证。推荐使用laozhang.ai中转服务避免此问题。
Q2: 图像生成质量不佳或出现艺术伪影?
A2: 优化提示词描述,增加具体的质量要求关键词如”high quality”、”detailed”、”professional”。
Q3: 生成速度过慢或经常超时?
A3: 实现重试机制,使用较小的分辨率进行测试,考虑使用缓存减少重复请求。
Q4: 如何处理内容政策违规问题?
A4: 建立提示词预过滤机制,避免敏感词汇,设计符合平台政策的内容生成策略。
7.2 监控与调试工具
class APIMonitor:
    def __init__(self):
        self.stats = {
            "total_requests": 0,
            "successful_requests": 0,
            "failed_requests": 0,
            "average_response_time": 0,
            "last_24h_usage": []
        }

    def log_request(self, success=True, response_time=0):
        """记录API请求统计"""
        self.stats["total_requests"] += 1

        if success:
            self.stats["successful_requests"] += 1
        else:
            self.stats["failed_requests"] += 1

        # 更新平均响应时间
        total_time = (self.stats["average_response_time"] *
                     (self.stats["total_requests"] - 1) + response_time)
        self.stats["average_response_time"] = total_time / self.stats["total_requests"]

        # 记录24小时内使用情况
        current_time = time.time()
        self.stats["last_24h_usage"].append({
            "timestamp": current_time,
            "success": success,
            "response_time": response_time
        })

        # 清理24小时前的记录
        cutoff_time = current_time - 86400  # 24小时
        self.stats["last_24h_usage"] = [
            usage for usage in self.stats["last_24h_usage"]
            if usage["timestamp"] > cutoff_time
        ]

    def get_success_rate(self):
        """获取成功率"""
        if self.stats["total_requests"] == 0:
            return 0
        return self.stats["successful_requests"] / self.stats["total_requests"]

    def print_stats(self):
        """打印统计信息"""
        print("=== API使用统计 ===")
        print(f"总请求数: {self.stats['total_requests']}")
        print(f"成功请求: {self.stats['successful_requests']}")
        print(f"失败请求: {self.stats['failed_requests']}")
        print(f"成功率: {self.get_success_rate():.2%}")
        print(f"平均响应时间: {self.stats['average_response_time']:.2f}秒")
        print(f"24小时内请求: {len(self.stats['last_24h_usage'])}次")
八、未来发展趋势与技术展望
8.1 技术发展方向
基于当前的技术发展趋势,GPT-image-1及其逆向工程技术将朝以下方向发展:
- 更高分辨率支持:预期将支持4K甚至8K分辨率的图像生成
- 实时编辑能力:实现类似Photoshop的实时图像编辑功能
- 视频生成扩展:从静态图像扩展到动态视频内容生成
- 3D模型生成:集成3D建模和渲染能力
- 多模态增强:更好地整合文本、语音、图像多种模态
8.2 应用场景扩展
🚀 未来应用前景
- 虚拟现实内容创作:为VR/AR应用生成沉浸式视觉内容
- 个性化教育:根据学习者需求生成定制化教学图像
- 医疗可视化:辅助医疗诊断和患者教育
- 建筑设计预览:快速生成建筑效果图和室内设计方案
- 游戏资产生成:自动化游戏美术资源创作
总结与行动建议
GPT-image-1逆向模型代表了AI图像生成技术的最新突破,通过深入理解其技术原理和实现方法,开发者可以:
- 掌握核心技术:理解自回归Transformer在图像生成中的应用
- 降低接入成本:通过中转服务实现70%成本节省
- 拓展应用场景:在电商、内容创作、UI设计等领域快速落地
- 确保安全合规:建立完善的安全防护和内容审核机制
🎯 立即行动
开始您的GPT-image-1之旅:
- 访问 laozhang.ai注册页面
- 使用推荐码
JnIT获得额外10%充值奖励 - 获取API密钥并开始技术测试
- 联系老张微信
ghj930213获得专业技术支持
技术支持联系方式:
- 老张微信:ghj930213
- 专业技术咨询,快速解决接入问题
- 提供定制化解决方案和成本优化建议
⚠️ 免责声明:本文提供的逆向工程技术仅供学习和研究使用,请遵守相关法律法规和平台服务条款。商业应用时请确保获得适当的授权和许可。
最后更新时间:2025年1月15日
🔄 本文将持续更新最新技术进展,建议收藏关注!